[2020 FIX] GeForce Experience Error Code 0x0001

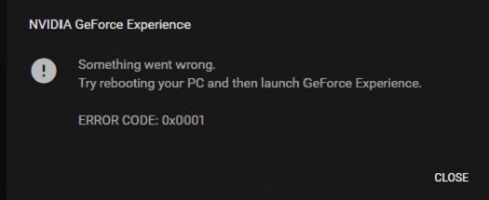
GeForce Experience is a great utility that allows Nvidia’s graphics card users to keep their drivers up-to-date, automatically optimize their game settings and more. But some users have been reporting the Error Code 0x0001 when trying to open the GeForce Experience application. The whole error reads as:
Something went wrong. Try rebooting your PC and then launch GeForce Experience, ERROR CODE: 0x0001.
If you’re also facing this error, don’t worry, we have jotted down a list of 5 fixes that will help.
How to Fix GeForce Experience Error Code 0x0001

- Relaunch GeForce Experience
- Check all the GeForce Experience related services
- Update your Nvidia Graphics Driver
- Make sure that Nvidia folders are owned by SYSTEM
- Reinstall GeForce Experience
Fix #1: Relaunch GeForce Experience
First things first, if you encounter this error, try rebooting your computer and then launch GeForce Experience by following these steps:
- Press Ctrl + Shift + Esc to open Task Manager.
- Select all the Nvidia tasks that are currently running, and click End task.
- Right-click on your GeForce Experience app icon and select Run as administrator.
Check to see if it works.
Fix #2: Check all the GeForce Experience related services
The Error 0x0001 may occur if a service used by GeForce Experience doesn’t have elevated privileges to interact with the local account.
Usually, it’s the NVIDIA Telemetry Container service which is the causing the error, but there are other cases as well where users had to modify settings for all GeForce Experience related services to solve the issue.
Here’s how to do it:
- Press Windows key + R to open the Run dialog box.
- Type “services.msc” in the dialog box and click OK.
- Locate NVIDIA Telemetry Container from the list of services, right-click on it and select Properties.
- On the Log On tab, make sure Allow service to interact with desktop is checked. If not, check this option and click Apply > OK.
- Make sure NVIDIA Telemetry Container is running. If it’s not running, right-click on it and select Start.
Now run GeForce Experience to see if it works. If it does, great! Problem solved. If it doesn’t, check the following GeForce services to make sure they are running:
- NVIDIA Display Container LS
- NVIDIA NetworkService Container
- NVIDIA LocalSystem Container
Fix #3: Update your Nvidia Graphics Driver
This particular issue could be caused by your old or corrupted Nvidia graphics card driver. So you can try updating your graphics driver to see if it solves your problem.
- Press Windows key + R to bring up the Run dialog box.
- Type “appwiz.cpl” and press Enter to open the Programs and Features window.
- Locate every installation published by Nvidia and right-click > Uninstall to remove every driver associated with your graphics card.
- Restart your computer.
- Now go to the official Nvidia Download Drivers web page and search to find the most recent driver that is compatible with your Windows version. Then download it.
- Once the download is complete, double-click on the file and follow the on-screen instructions to install the driver.
Fix #4: Make sure that Nvidia folders are owned by SYSTEM
According to some users, the issue was resolved after they modified the ownership of the Nvidia folders to SYSTEM. Here’s a quick guide on how to check and fix the Nvidia folders if they don’t have necessary permissions:
- Open File Explorer and navigate to the following location: C:\Program Files (x86)
- Right-click on NVIDIA Corporation and choose Properties.
- Go to the Security tab and click on the Advanced button.
- In the Advanced Security Settings, make sure that the Owner is set as SYSTEM. If it isn’t, click on Change.
- In the box under Enter the object name to select, type SYSTEM and then click on Check Names.
- Click OK > Apply to save the settings.
- Now navigate to the location C:\Program Files and repeat steps 2 to 6 with this folder.
Restart your computer and open Nvidia Experience to see if the issue is resolved. If it persists, don’t frustrate – there’s still one more fix to try.
Fix #5: Reinstall GeForce Experience
There may be an issue with the GeForce Experience itself. You can fix it by simply reinstalling your GeForce Experience app. Here is how to do it:
- In the Windows Search bar, type “feature” and then select Apps & features.
- Click GeForce Experience > Uninstall.
- Download a new GeForce Experience from the official NVIDIA website.
- Install this new software and run it on your Windows to see if it works properly.
So which of the above methods helped you fix the GeForce Experience Error Code 0x0001? Free free to share your experiences in the comments below.
READ NEXT