[Fixed] DHCP Lookup Failed On Chromebook & Windows
When you try to connect to the internet, your device needs an IP Address to communicate with other devices. Sometimes, this process doesn’t go as smoothly as we would like, and errors can occur. One such error is the DHCP Lookup Failed error. This guide aims to help you understand this error and provide step-by-step solutions to fix it.
Understanding DHCP
DHCP, or Dynamic Host Configuration Protocol, is a network protocol that automatically assigns IP addresses to devices on a network. When your device connects to a new network, it sends out a DHCP request to obtain an IP address. This is a fundamental step for any device to connect to the internet.
Potential Causes of the DHCP Lookup Failed Error
This error can be caused by various issues, including:
- Network cable unplugged.
- DHCP server (usually your router) malfunctioning.
- IP address conflict on the network.
- ISP (Internet Service Provider) issues.
- Firewall or security software blocking DHCP requests.
How to Fix DHCP Lookup Failed Error
Method 1: Restart the Router
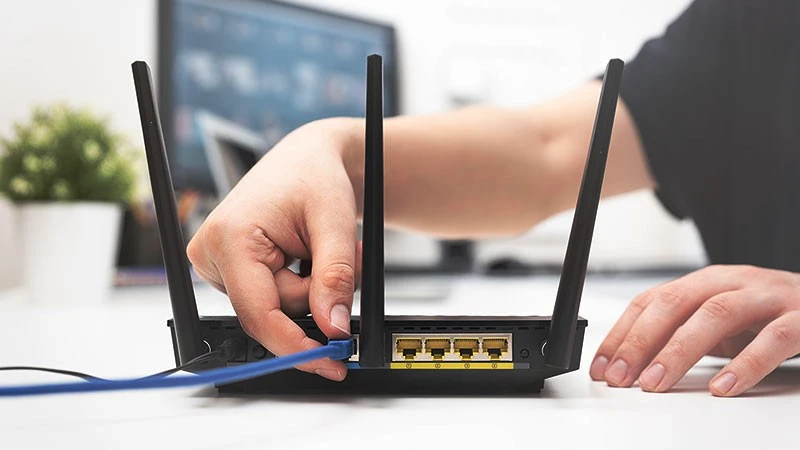
The first and most straightforward step to resolve any DHCP error is to restart your router. This action can clear out any temporary issues causing the problem and reset its configuration.
1. Turn off the router using its power button.
2. Wait for at least 10 seconds.
3. Turn the router back on.
4. Wait for the router to fully restart and the lights to stabilize.
Method 2: Extend the DHCP Range in the Router
Sometimes the DHCP error is due to the range of IP addresses that the router is set to assign. Here’s how to modify it:
1. Open your internet browser and type in the router’s IP address (commonly “192.168.1.1”).
2. Log in using the router’s username and password (often “admin/admin”).
3. Navigate to the DHCP settings page.
4. Change the starting and ending IP address ranges as desired.
5. Save the changes before exiting the settings page.
Method 3: Update the Router’s Firmware
Keeping your router’s firmware up-to-date is essential. Updated firmware often contains fixes for various issues, including DHCP errors.
1. Visit the router manufacturer’s website and look for firmware updates.
2. Download the latest firmware version.
3. Log in to your router’s settings (as in step 2).
3. Navigate to the Firmware Update section.
4. Upload the downloaded firmware file and initiate the update.
5. Wait for the update to complete without interrupting the process.
Method 4: Reset the Router
If the above steps don’t work, resetting the router to its factory settings might be necessary.
Warning: This will erase all your settings.
1. Find the Reset button on your router (usually a small pinhole button).
2. Press and hold the button for 10 seconds.
3. Wait for the router to fully reset and restart.
DHCP Lookup Failed Error: Chromebook Specific Solutions
Method 1: Restart the Chromebook
A simple restart can solve a host of issues:
1. Save any open files.
2. Click on the time at the bottom right of the screen.
3. Click on the Power icon.
Method 2: Update the Firmware
Ensure your Chromebook’s operating system is up-to-date:
1. Go to Settings.
2. Click on About Chrome OS.
3. Click on Check for updates.
Method 3: Change DNS Server on Chromebook
Changing the DNS server can resolve connectivity issues:
1. Open Settings.
2. Click on Network.
3. Select your Wi-Fi network, then click on the gear icon.
4. In the Name servers section, select Custom name servers.
5. Enter “8.8.8.8” and “8.8.4.4” (Google’s DNS servers).
6. Click Save.
DHCP Lookup Failed Error: Windows Specific Solutions
Method 1: Restart the Computer
The classic “turn it off and on again” method is often effective:
- 1. Save any open files.
- 2. Go to Start, click on the Power icon, and select Restart.
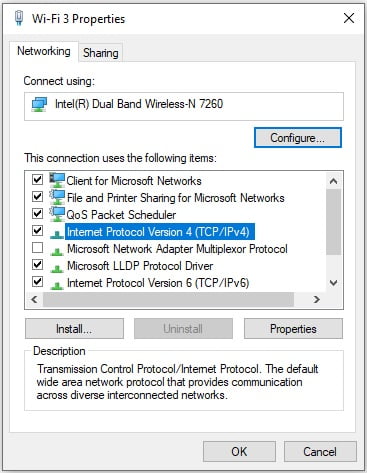
Method 2: Check Network Connection Settings
Ensure your computer is set to obtain an IP address automatically:
1. Right-click on the Network icon in the taskbar.
2. Select Open Network & Internet settings.
3. Click on Change adapter options.
4. Right-click your network connection and select Properties.
5. Double-click on Internet Protocol Version 4 (TCP/IPv4).
6. Select Obtain an IP address automatically and Obtain DNS server address automatically.
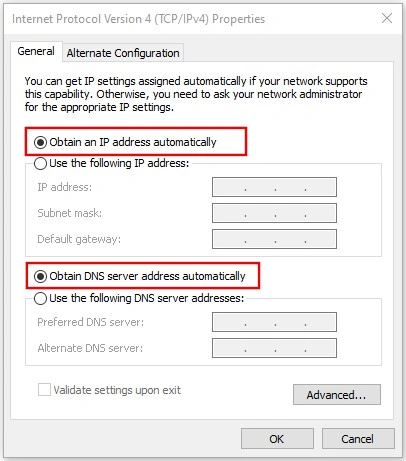
7. Click OK.
Method 3: Manually Setting Your IP Address
If automatic settings aren’t working, try setting your IP address manually:
1. Follow the steps in section 2 until you reach the Internet Protocol Version 4 (TCP/IPv4) properties.
2. Select Use the following IP address.
3. Enter a specific IP address, Subnet Mask, and Default Gateway (these details can be obtained from your network administrator).
4. Click OK.
Method 4: Change the DNS Server on Windows
1. Follow the steps in section 2 until you reach the Internet Protocol Version 4 (TCP/IPv4) properties.
2. Select Use the following DNS server addresses.
3. Enter “8.8.8.8” as the Preferred DNS server and “8.8.4.4” as the Alternate DNS server (Google’s DNS servers).
4. Click OK.
Wrapping It Up
The DHCP Lookup Failed error can be frustrating, but with patience and a systematic approach, it is usually resolvable. This guide has aimed to provide comprehensive steps to diagnose and resolve this error for both Chromebooks and Windows computers. If you’ve tried all the steps and the issue persists, it might be time to call in professional help. Remember, you’re not alone in this – technicians are just a phone call away!