Fixed: TiWorker.exe High Disk Usage on Windows 10
It often occurs that our PC slows down and we’re unable to figure out the main cause. In such a situation, if you open the Task manager, you’ll see that a process named “TiWorker.exe” is the main culprit. This program is related to the Windows Update Service and it uses too many system resources which results in high disk usage.
To end the frustration, we have come up with fixes that will help in handling the situation and boost up your slowed down PC.
What is TiWorker.exe?
The TiWorker.exe is also known as Windows Module Installer Worker and it manages the addition and removal of Windows System Updates and other files. The program is continuously running in the background and it keeps on searching for Windows Updates. Whenever the system is installing updates, the TiWorker.exe program takes up the resources and causes the overall functions to slow down.
If you’re using Windows 10, then you must know that this program will slow down the PC often as Windows downloads and installs various updates automatically on a regular basis. So, if it’s an occasional slow down by the program, then there’s nothing to worry. However, if the program slows down your PC too often and uses too much disk space, then it’s time to fix it.
How to fix TiWorker.exe high disk usage on Windows 10
Since the program mainly focuses on Windows Updates, therefore we have to look into related programs like the Windows Update Service to solve the issue. The following methods will help you fix the TiWorker.exe high CPU or disk usage on Windows 10:
- Restart Windows Update Service
- Clear Windows Update Files
- Run Windows Update Troubleshooter
- Run SFC and DISM
- Reduce the TiWorker process priority
- Update your device drivers
Fix 1: Restart Windows Update Service
The first thing to do is to make sure that the Windows Update service is running properly on the system. If it is causing high disk usage, it’s time to restart it. You can restart the Windows Update service in the following way:
- Press Windows key + R to open the Run dialog box.
- Type “services.msc” and click OK.
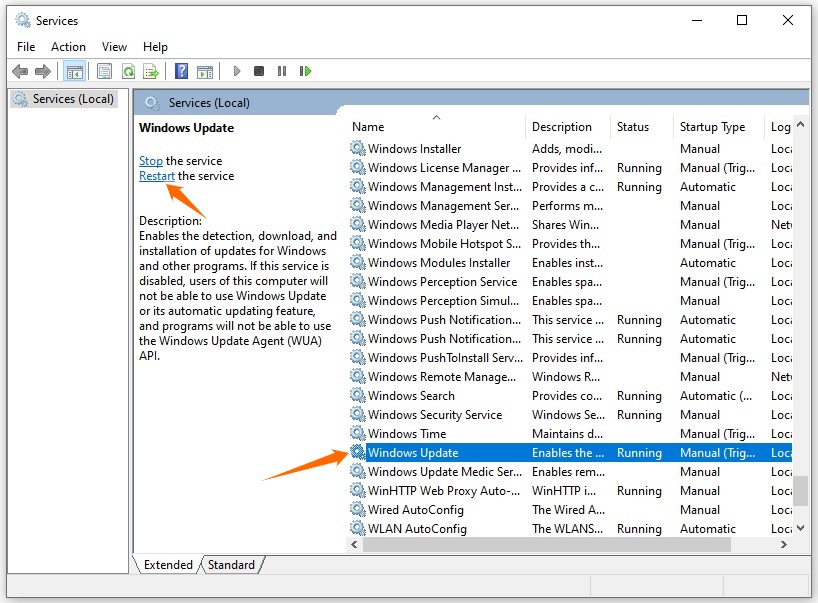
- You’ll see a list of services; locate and single click on Windows Update.
- Click on Restart in the service description on the left. This will restart the Windows Update service.
Fix 2: Clear Windows Update Files
The Windows Update stores the files into a folder known as ‘Software Distribution’. If some of these files are corrupted, they may cause issues with the Windows Update. Clearing the files from this folder can help resolve the issue. Follow these steps to do so:
- Press Windows key + R to open the Run dialog box.
- Type “services.msc” and click OK.
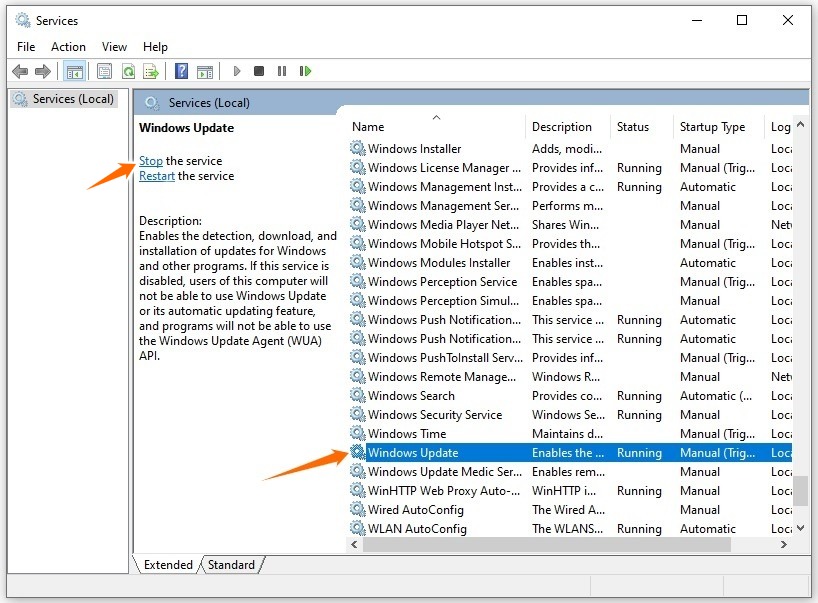
- Single click on the Windows Update service.
- This time click on Stop to disable the service.
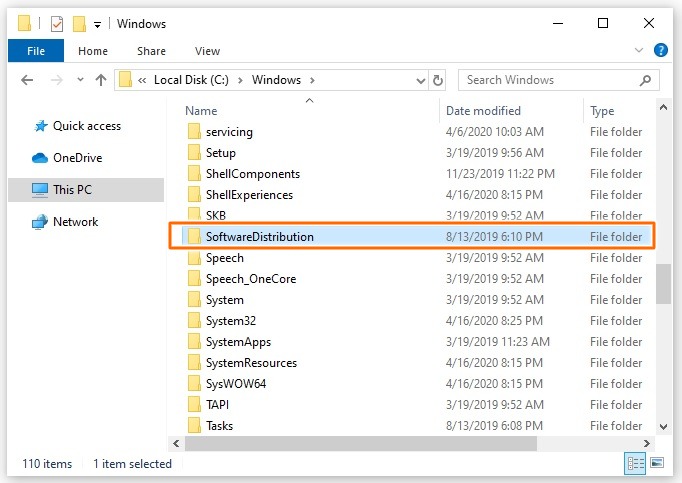
- Open the File Explorer and then go to C:\Windows.
- Find the SoftwareDistribution folder and delete it.
- Restart your computer and see if the problem is resolved.
Fix 3: Run Windows Update Troubleshooter
Check if there are any problems with Windows Update. Best is to do it using the Windows Update troubleshooter which will detect the Windows updating problems and will fix them accordingly. Do it as follows:
- Right-click on the Windows Start button and select Settings.
- Click on Update & Security.
- Navigate to Troubleshoot in the left pane.
- Select Windows Update from the list and click the Run the troubleshooter button.
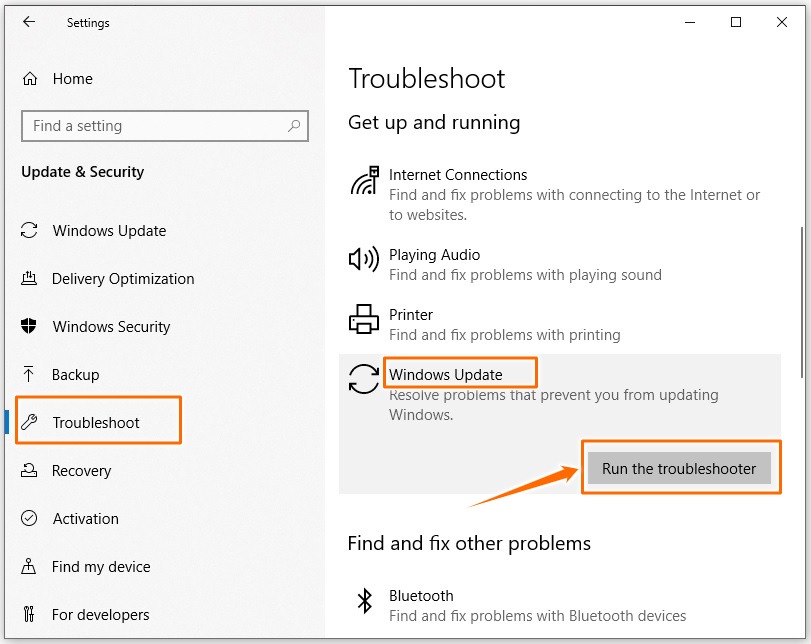
The Windows Update troubleshooter will start troubleshooting the errors in your system, including the TiWorker.exe high disk issue.
Fix 4: Run SFC and DISM
System File Checker (SFC) and Deployment Image Servicing and Management (DISM) are quite helpful in this regard as they can pinpoint the issues with TiWorker.exe. Follow these steps:
- Type “Command Prompt” in the search field next to Windows Start menu, then right-click on it and select Run as Administrator.
- In the Command Prompt window, type the command “sfc /scannow” and hit Enter.
- Wait until the scan completes.
- Then type “dism.exe /online /cleanup-image /restorehealth” and hit Enter to run DISM.
- After the process is finished, reboot your computer and see if the TiWorker.exe process has calmed down.
Fix 5: Reduce the TiWorker process priority
You can try to set the priority of TiWorker.exe to “low” to get rid of this issue. Here’re the steps:
- Right-click on the Windows Start button and select Task Manager.
- In the Task Manager window, go to the Details tab.
- Scroll down the list until you’ve found TiWorker.exe. Right-click on the app and select Set priority > Low.
- When prompted for permission to make changes, click Change priority.
- Exit the window.
Check if the method solves your TiWorker.exe issue.
Fix 6: Update your device drivers
Sometimes the TiWorker.exe starts using too much disk because of faulty or outdated drivers. In this case, updating your device drivers could be helpful. To do that:
- Right-click on the Windows Start button and select Device Manager.
- Select a category to check the devices on your PC.
- Right-click the device that you’d like to update and select Update driver.
- Click Search automatically for updated driver software.
- If Windows couldn’t update it, then download and install the latest driver version from its manufacturer’s website.
So there you have it – the four effective ways to fix the TiWorker.exe high disk usage on Windows 10. If you have any questions or suggestions, please feel free to leave a comment below. Thanks for reading!
READ NEXT