NVIDIA Control Panel Missing? Easy FIX [2022 Update]
Nvidia Control Panel is a Windows utility tool that lets users tweak the settings of their Nvidia branded graphics card from a centralized interface. However, users are facing issues as the NVIDIA Control Panel seems to go missing from the desktop context menu and the taskbar menu without a trace. This way, people are unable to get the maximum out of their GPUs which can be a hindrance to their work and entertainment.
What causes the NVIDIA Control Panel Missing error?
There isn’t a specific reason as to why the NVIDIA Control Panel goes missing in the first place. However, there are certain common factors among the affected users that help put things into perspective. These factors include, but are not limited to, corrupt or outdated graphics drivers, incorrect registry values, Windows services issues, corrupt NVIDIA Control Panel, and general Windows 10 bugs. A recent Windows update can also cause compatibility issues with the graphics driver which results in the NVIDIA Control Panel missing.
How to Fix NVIDIA Control Panel Missing in Windows 10/11
If you’re experiencing the Nvidia Control Panel missing issue in Windows 10, do not panic. You can try the following methods to restore the missing Nvidia Control Panel easily!
Fix 1 – Unhide the NVIDIA Control Panel
The NVIDIA Control Panel may have disappeared from the context menu or the notification tray due to a Windows bug or a third-party application. This can be easily fixed by following the steps listed below.
Step 1: Press Windows key + S and type NVIDIA Control Panel in the search box. Open the NVIDIA Control Panel.
Alternatively, you can access the NVIDIA Control Panel by opening the regular Control Panel. Change the View by option to Large icons to access more options. Then click on the NVIDIA Control Panel option.
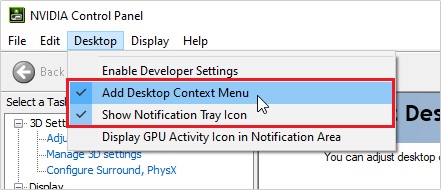
Step 2: Go to the Desktop tab and check the Add Desktop Context Menu and Show Notification Tray Icon options. Save the changes.
Step 3: Close the NVIDIA Control Panel. Restart the PC and check if the issue persists.
Fix 2 – Restart NVIDIA Services
NVIDIA services end up running the entire show and are responsible for the proper functioning and visibility of the NVIDIA Control Panel. If these services are not running or stopped for any reason, the NVIDIA Control Panel is not going to work and may go missing. Sometimes, even if the services are running, these issues can happen. In this case, restarting the NVIDIA services can fix the issue.
Step 1: Press Windows key + R and type “services.msc” in the Run window. Press Enter. The Services window will open.
Step 2: Locate the following services from the list: NVIDIA Display Container LS, NVIDIA LocalSystem Container, NVIDIA NetworkService Container, and NVIDIA Telemetry Container.
Step 3: Right-click each service one at a time and then click on the Restart option. If any of the services are not running, right-click the service and select the Start option.
Step 4: Restart the PC. Check and see if the issue persists.
Fix 3 – Manually Open the NVIDIA Control Panel
If the NVIDIA Control Panel still isn’t showing up, opening it manually can do the trick. Here’s how you can open the NVIDIA Control Panel manually:
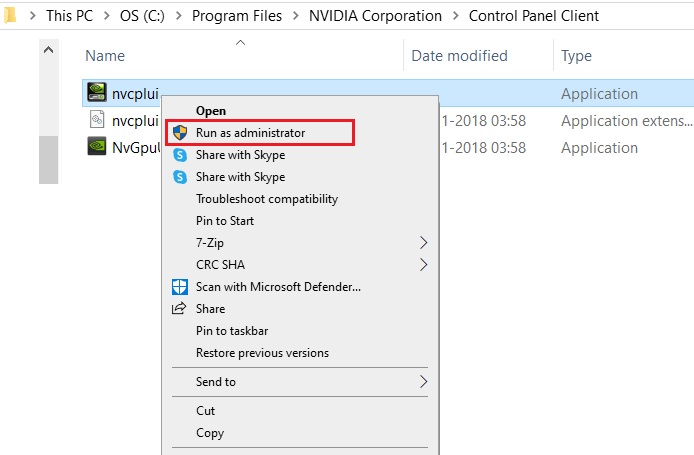
Step 1: Navigate to the following directory:
C:\Program Files\NVIDIA Corporation\Control Panel Client
Step 2: Once inside the Control Panel Client folder, right-click the nvcplui.exe file and select Run as administrator.
Fix 4 – Update, Roll back, Reinstall your NVIDIA Graphics Drivers
One of the more common causes for the missing NVIDIA Control Panel issue is outdated or corrupt graphics drivers. In some instances, incompatible graphics drivers may also be the issue. In this case, a rollback to the previous driver version may be necessary. To update, roll back, or reinstall the graphics drivers, follow the instructions below.
Update Drivers:
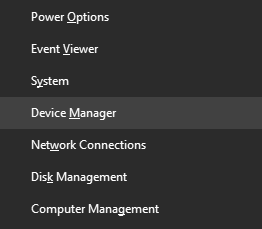
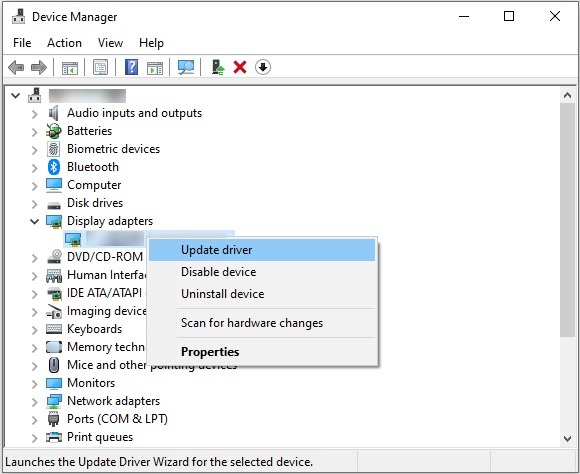
Step 1: Press Windows key + X and open the Device Manager from the menu.
Step 2: Expand the Display adapters section, right-click the NVIDIA driver, and then select Update driver to start the update process.
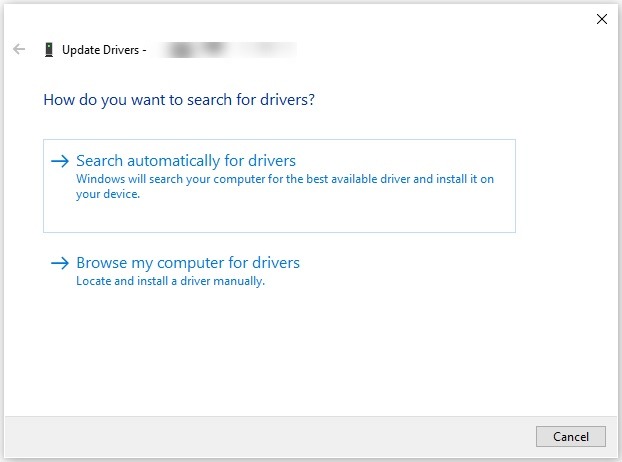
Step 3: Select the Search automatically for drivers option and follow the on-screen instructions to complete the update process.
Roll back Drivers:
If the updates aren’t available, use ‘Roll Back’ to go to a previous version of the driver.
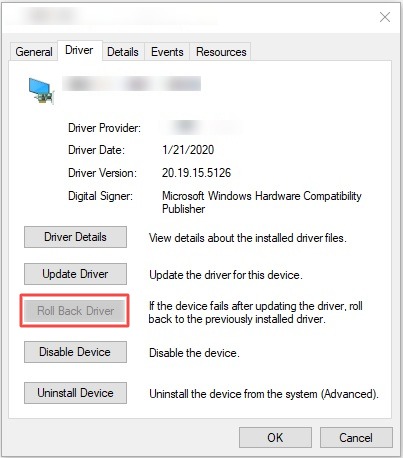
Step 1: Right-click the NVIDIA device driver under the Display adapters section and go to Properties.
Step 2: In the Properties window, go the Driver tab and select the Roll Back Driver option if it is available. Follow the on-screen instructions to complete the process.
Reinstall Drivers:
If the drivers are corrupt, you will need to reinstall them again.
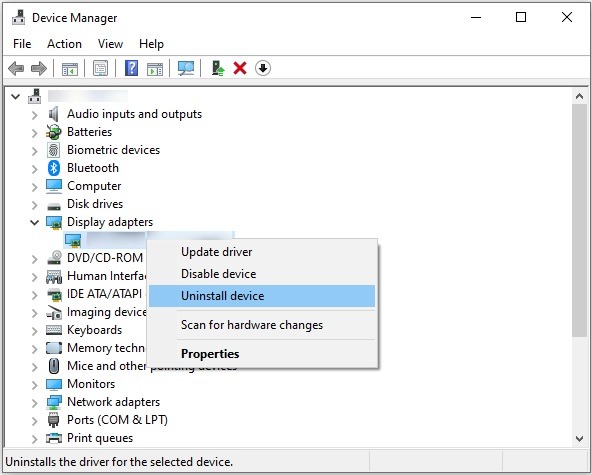
Step 1: Right-click the NVIDIA device driver under the Display adapters section and then select the Uninstall device option. Follow the on-screen instructions to complete the uninstallation process.
Step 2: Restart the PC. The uninstalled drivers will be installed automatically.
If the drivers fail to install automatically, you can download the drivers from the manufacturer’s website and install them manually.
Fix 5 – Final Solution (NVIDIA Support Recommended)
If the issue still isn’t resolved by now and you’re reading this, then, as a last resort, you can try this solution that was recommended by NVIDIA Support itself.
Step 1: Navigate to the following directory:
C:\Program Files (x86)\NVIDIA Corporation\Display.NvContainer
Note: If you cannot find the ‘NVIDIA Corporation’ folder in the Program Files (x86) folder, you can find it in the Program Files folder instead.
Step 2: Copy the NVDisplay.Container.exe file.
Step 3: Press Windows key + R to open the Run window and type “shell:startup” in the text field. Press Enter to open the Startup folder.
Step 4: Paste the copied file NVDisplay.Container.exe (Step 2) in the Startup folder.
Step 5: Right-click the copied file NVDisplay.Container.exe in the Startup folder and then click on the Properties option.
Step 6: In the Properties window, under the Compatibility tab, check the Run this program as an administrator option. Click OK to save changes.
Step 7: Restart the PC.
READ NEXT

![[FIXED] Your Profile Was Signed Out MW2 & Warzone 2](https://digiworthy.com/wp-content/uploads/2023/06/Your-profile-was-signed-out-768x432.webp)