HyperX Cloud 2 Mic Not Working? Here’s The Fix!
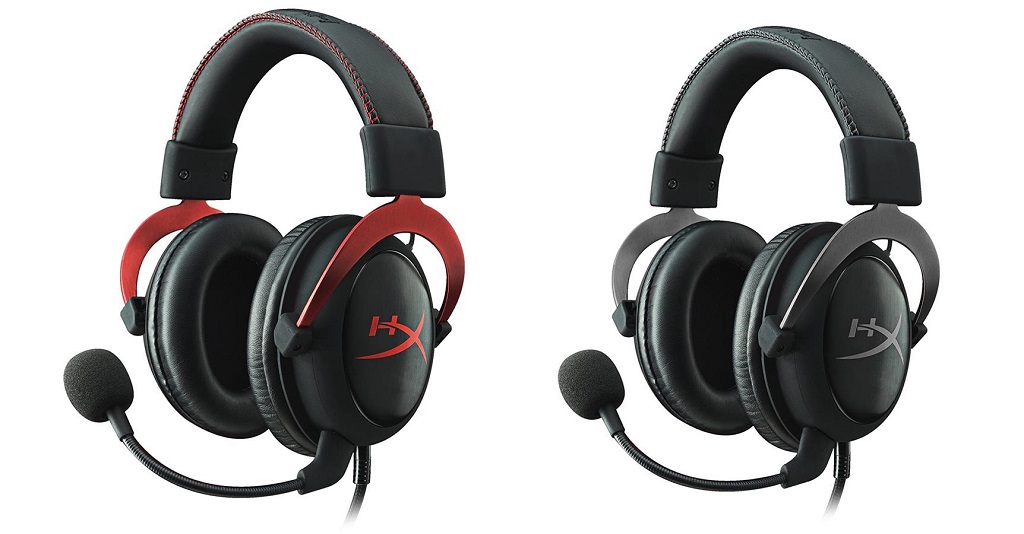
If you’re facing any trouble with your favorite HyperX Cloud 2 mic, then you aren’t alone because this problem is common among users. We understand that it’s annoying if you can’t talk to your loved ones or play your favorite games using your headset, but worry not: we have some fixes for you to try. You can solve the HyperX Cloud 2 mic not working issue easily without the help of an expert.
How to fix HyperX Cloud 2 mic not working
HyperX Cloud 2 is a gorgeous gaming headphone which can bring an immersive experience to the users. The headphone is very comfortable and is perfect for using for long gaming sessions.
While the headphone has managed to satisfy most of the users, there are some who are complaining about its mic not working. There can be a few reasons why HyperX Cloud 2 mic isn’t working. These are as follows:
- Audio software malfunctioning
- Game audio settings
- Loose or faulty connections
- Microphone isn’t set as default
- Outdated audio drivers
- Volume control obviation
This post will guide you through almost all the fixes present for solving the HyperX Cloud 2 mic not working on Windows 10. It isn’t necessary that you have to try all of them, just try them one by one until you reach the one that works for you.
Fix 1: Perform basic troubleshooting
The first thing to check is whether the mic on your headset is connected properly or not. Sometimes the problem is very simple but we can’t figure out and go towards more complex methods. So, before trying the difficult fixes, do these simple things:
- Make sure that the mute switch isn’t activated if you are using the USB switcher of the headphone.
- Make sure the connectors are properly seated. If they are properly seated and still the mic isn’t working, try plugging the USB cable into another USB port. You can also use the 3.5 mm jack instead of using the USB.
- Right click on the speaker icon in the Window’s taskbar. Choose ‘Troubleshoot sound problems’ from the popup menu and follow the troubleshooting steps. Apply the fixes recommended.
Fix 2: Check your sound settings
Another reason that the HyperX Cloud 2 might not work is that it is not set as default device or is disabled on your PC. To set the headphone as the default device and to re-enable it, follow these steps:
- Press the Windows logo key along with the R key on your keyboard so that the Run dialog appears. Type ‘control’ and press Enter.
- In the Control Panel, select Large icons from the View by drop-down menu.
- Select Sound and click on the Recording tab.
- Right-click on any empty space in the device list and select Show Disabled Devices.
- Right-click the Headset Microphone and select Enable. Then right-click on it again and select Set as Default Device.
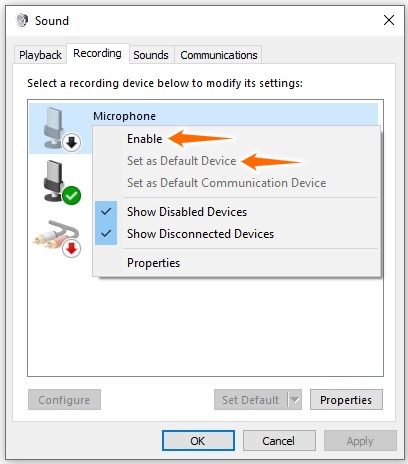
Check if the mic is working. If it isn’t, move on to the next fix below.
Fix 3: Update your audio driver
An outdated or corrupt audio drivers can also cause the HyperX Cloud 2 microphone to stop working. You can update your driver to fix this issue. Here’s how to do it:
- Open the Run dialog by pressing the Win+R keys simultaneously. Type ‘devmgmt.msc’ to open the Device Manager.
- Double click on Audio inputs and outputs and expand the list.
- Right-click on the driver associated with the HyperX Cloud 2 mic and select Update driver.
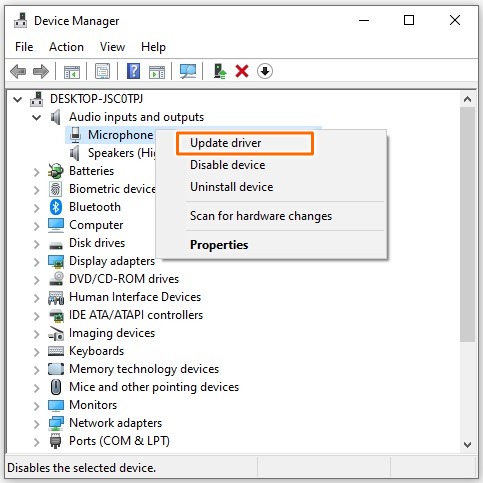
- In the pop-up window, click Search automatically for updated driver software. Windows will then search for any available updates and install it automatically.
Fix 4: Reset or reinstall Windows
If there are any corrupt files on the system, it will prevent the HyperX Cloud 2 mic from working properly. So after backing up the important files in your system, reinstall Windows. Then reinstall your headset driver according to the instructions provided and check if the mic is working.
READ NEXT

![SKYUI Error Code 1, SKSE Not Running: Quick Fix [2023]](https://digiworthy.com/wp-content/uploads/2020/12/SKYUI-Error-Code-1-img0-768x432.jpg)
![[Fixed] Gears of War 4 Crashing Issue on PC](https://digiworthy.com/wp-content/uploads/2019/02/gears-of-war-4-pc_crashing-768x432.jpg)
