[Solved] Destiny 2 Servers are Not Available on PC
Many players are reporting that they are unable to connect to Destiny 2 servers and thus can’t play the game. When they start the game, they get an error saying “Destiny 2 servers are not available”. If you are facing the same error, don’t worry. This is a common Destiny 2 server issue and can be fixed easily.
Why are Destiny 2 Servers Down on My PC?
Destiny 2 is a popular game and is played by millions of people from around the world. So there is a high chance that too many players are trying to launch the game at the same time. This can lead to the Destiny 2 server status going down causing the error.
Apart from this, the error can occur when there is something wrong with your network, which includes issues with your network adapter and the network driver too.
The error also shows up when the Destiny game developer Bungie is maintaining or repairing the servers. In such a situation, the players are notified beforehand that they’ll be facing the server issues.
How to Fix ‘Destiny 2 Servers are Not Available’ Error?
If Destiny 2 servers are not available for you then you first need to figure out the cause of the issue. If in case the servers are down due to maintenance or repair, restart your game in different frames and then check. If the Destiny 2 server error persists even when there is no maintenance going on from the developer’s side, it is time to try the fixes. Following are the methods you must try:
- Disable DHCP for your connection
- Reset TCP/IP address
- Use the Ethernet connection
- Update your network card driver
- Enable UPnP for Windows 10 Network
Fix #1: Disable DHCP for your connection
DHCP stands for Dynamic Host Control Protocol. It is a traditional method of dynamically assigning an IP address to your PC. If you’re connecting via WiFi, DHCP can give rise to the servers unavailable error in Destiny 2. Thus, you can disable this functionality and try to assign IP addresses manually to see if it solves your problem. Here’s how you do it on Windows 10:
- Right-click the network icon at the bottom right corner of your desktop, and select Open Network & Internet settings.
- Click Network and Sharing Center in Settings.
- Click Change adapter settings in the left pane.
- Right-click on the connection you’re using and select Properties.
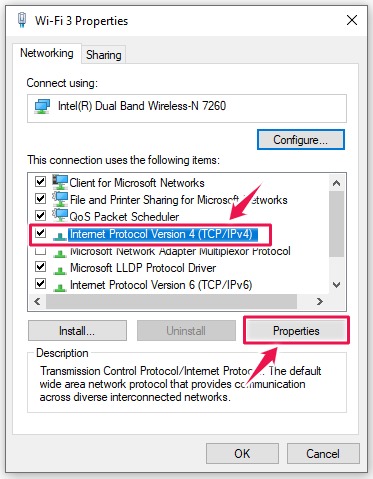
- Choose Internet Protocol Version 4 (TCP/IPv4), then click Properties.
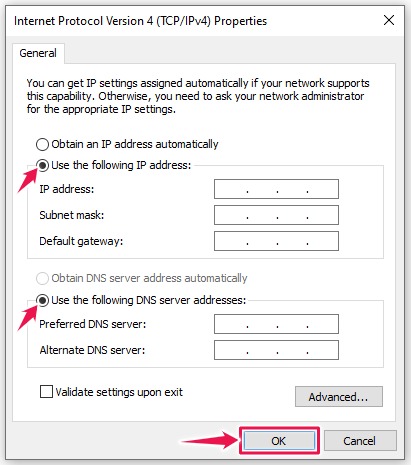
- Select Use the following IP address and Use the following DNS server addresses. Then enter your computer’s IP address and DNS servers addresses by yourself. Click OK to save changes.
Now restart your computer and launch Destiny 2 again to see if it works. If it still gives the error, don’t worry – just move to the next fix below.
Fix #2: Reset TCP/IP address
Next, you should make sure that there is no network corruption on your Destiny 2 PC. To do this, try resetting your IP address, and once the network connection error is resolved, the Destiny 2 servers should be available for you. Follow these steps:
- Type ‘cmd’ in the Windows Search box. Right-click Command Prompt as it appears as a result and select Run as administrator.
- In the Command Prompt window, input ‘netsh winsock reset’ and press Enter. This will reset the TCP/IP address.
- Restart your PC to take effect.
Fix #3: Use the Ethernet connection
Games like Destiny 2 require a more stable and faster internet connection to run smoothly. Therefore, it is recommended to use an Ethernet connection on your computer to make sure you don’t face any problem. If there’s no Ethernet connection, use these steps to force your computer as well as game to connect via WiFi:
- Right-click the network icon at the bottom right corner of your desktop, and select Open Network & Internet settings.
- Click Network and Sharing Center in Settings.
- Click Change adapter settings in the left pane.
- Right-click on the connection you’re using and select Disable.
- Repeat this step for any other connections that you aren’t using.
- Now your computer will only connect via WiFi. Restart the game and see if it works.
Fix #4: Update your network card driver
An outdated or corrupt network driver can cause the network issue, so it is important to keep it updated. You can uninstall your network driver and then reinstall an updated one to see if it helps fix the Destiny 2 connectivity issue. Here’s how to do it:
- Go to the manufacturer’s website and download the latest version of your network driver.
- Next, type ‘device manager’ in the search box and click to open it from the list of search results.
- Locate Network adapters and expand it. Then right-click on the network driver and select Uninstall.
- Find the network driver package that you downloaded in the step 1 and install it on your PC.
Fix #5: Enable UPnP for Windows 10 Network
If you’ve been playing Destiny 2 on more than one console, then you’ll need a UPnP (Universal Plug and Play) for that. The UPnP enables computers with the same network to recognize each other. Thus, turning on UPnP can work for you in this situation.
- Navigate to Control Panel > Network and Internet > Network and Sharing Center.
- Click Change advanced sharing settings in the left pane.
- Under Network discovery, select Turn on network discovery and then click Save changes.
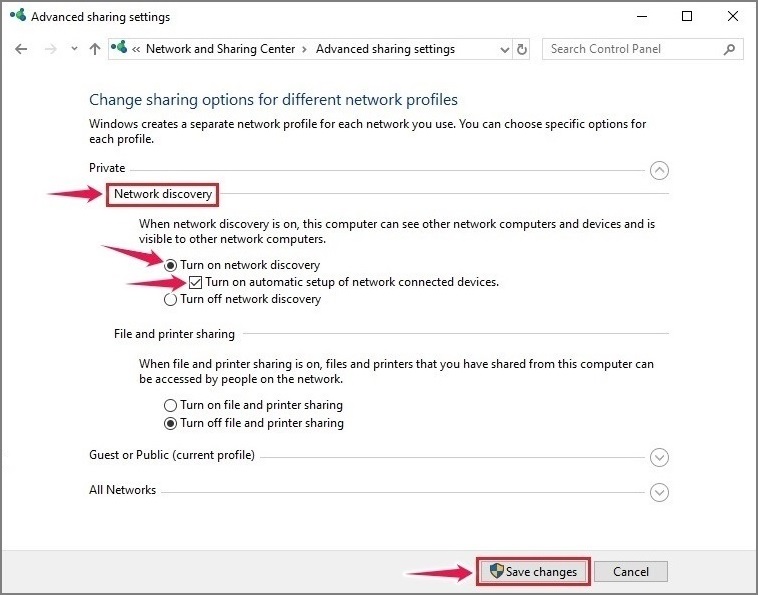
- Relaunch Destiny 2 and check to see if you’re able to play it on more consoles without any problem.
We hope this guide helped you fix the “Destiny 2 servers are not available” error on PC. For more help, you can head over to the Bungie Destiny 2 forums and report your problem there.

![SKYUI Error Code 1, SKSE Not Running: Quick Fix [2023]](https://digiworthy.com/wp-content/uploads/2020/12/SKYUI-Error-Code-1-img0-768x432.jpg)
![CSGO Keeps Crashing [2020] – Easy Fix](https://digiworthy.com/wp-content/uploads/2020/01/csgo-keeps-crashing-768x512.jpg)
