Fix: VAC Was Unable to Verify the Game Session CSGO 2020
If you are reading this article, there is a good chance that you have received the error, “Matchmaking Failed – VAC was unable to verify your game session” while playing CS:GO. If yes, then don’t worry; this article will guide you the best. We’ve gathered a list of the best fixes that can help you get rid of this issue in no time.
But first, what is CSGO VAC Error?
VAC refers to Valve Anti-Cheat, which is – as the name implies – an anti-cheat software developed as part of the Steam platform, first released with Counter-Strike: Global Offensive (CS:GO) in 2002. When the software detects any cheat on the player’s end, it will automatically disable it in the future, possibly days or weeks after the detection.
As for the error message saying VAC was unable to verify the game session, this usually occurs due to misconfigured files in your game, causing VAC to fail in verifying the source of the game. As a result, you won’t be able to find a match until you fix this game error.
How to Fix VAC Was Unable to Verify Your Game Session Error
Are you encountering the CSGO VAC error? This can be frustrating, but the good news is there’s an easy fix that works in 2020. You can try one of the methods below to get rid of this issue quickly and easily!
- Run Steam and CS:GO as Administrator
- Repair your Steam client
- Verify the integrity of your game files
- Update your device drivers
- Disable/Uninstall the third-party software
- Reinstall CS:GO
Fix #01: Run Steam and CS:GO as Administrator
The CSGO VAC may not be able to verify the game session because Steam couldn’t access certain game files on your computer under the normal user mode. In that case, you need to grant administrative privileges to the Steam client. That should help you fix other game issues as well, such as crashing, freezing and stuttering on Windows 10.
Here’s how you can run Steam as an administrator:
- Exit Steam if you’re already running it.
- Hit Windows+R to bring up the Run dialog.
- Type in C:\Program Files (x86)\Steam to open the Steam folder (obviously change this if Steam is installed on a different drive).
- Once there, find out Steam.exe and right-click it, then select Properties.
- Click the Compatibility tab and check the box of Run this program as administrator.
- Then click Apply and OK to save your changes.
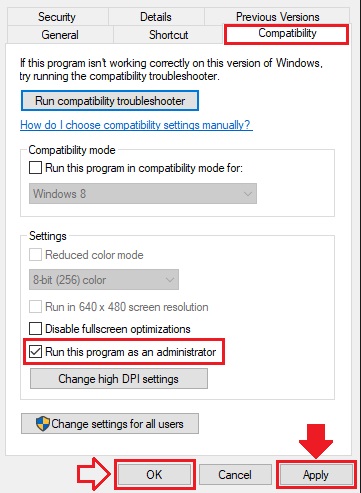
Now relaunch your CSGO and try to play it again. Check to see if VAC is still unable to verify the game session and CSGO matchmaking remains unavailable for you on Windows 10. If yes, then go ahead with the next fix.
Fix #02: Repair your Steam client
Maybe your Steam client is corrupted, leading to the CSGO VAC error. That is why Valve recommends users to repair the Steam client in case that’s the problem. To repair your Steam client:
1. Right-click the Windows Start menu and select Task Manager from the list.
2. In the Task Manager window, locate the Steam client service and right-click it to End task.
3. Next, type cmd in the Windows search box, then right-click Command Prompt and select Run as administrator.
4. In the Command Prompt window, type the following command and then hit Enter:
C:\Program Files (x86)\Steam\bin\SteamService.exe /repair
5. Run Steam client and launch the game to see if the error is fixed or not.
That should repair the Steam client. Once it is done, try to open Steam up again and relaunch CSGO to see if it works properly.
Fix #03: Verify the integrity of your game files
If VAC fails to verify your game session, you might as well want to verify Steam cache in the Steam client app. This will detect any corrupted or missing game files and help fix them in advance.
Here’s how you can verify the integrity of your game files:
- Open the Steam client and click LIBRARY.
- Find out and right-click Counter-Strike: Global Offensive, then select Properties.
- Click the LOCAL FILES tab and choose to VERIFY THE INTEGRITY OF GAME FILES.
- Wait for the process to complete, then exit Steam.
Once done, restart your computer and run CS:GO to see if it’s working properly. If the error is still occuring, move to the next fix below.
Fix #04: Update your device drivers
Errors in your game are often a result of the outdated drivers in your computer. You can easily update your drivers to see if that was the root cause of your problem. Here’s how you can do it manually:
- Type ‘Device Manager‘ in the search bar and then press Enter to open it.
- Select a category to check the devices on your PC.
- Right-click the device that you’d like to update.
- Select Search automatically for updated driver software.
- Click on Update Driver.
- If Windows doesn’t update it, then check the manufacturer’s website for new updates.
You can update all your drivers through this simple method. This might take some time, but it is the best solution for a lot of your game errors.
Fix #05: Disable/Uninstall the third-party software
Sometimes a third-party software is not compatible with your system preventing VAC from verifying your game. You can temporarily disable the software or uninstall it from Windows 10 to solve this issue.
Just navigate into your third-party software and then choose to disable it for some time. Or, you can determine to uninstall the software by heading over to Control Panel > Programs > Programs and Feature > Uninstall.
Fix #06: Reinstall CS:GO
If none of the solutions from above helped, then reinstalling CSGO can do the trick. Here’s how to do it properly:
- Open the Steam client, then click LIBRARY.
- Right-click Counter-Strike: Global Offensive and select Uninstall.
- Confirm to DELETE.
- Relaunch Steam to download and reinstall CSGO.
Hopefully, this guide helped you in fixing the “Matchmaking Failed – VAC was unable to verify your game session” error. Let us know in the comments below if you have any questions and suggestions. Thanks for reading!
READ NEXT

![[2020 FIX] GeForce Experience Error Code 0x0001](https://digiworthy.com/wp-content/uploads/2020/05/nvidia-geforce-experience-error-768x432.jpg)
