[Fixed] Network Protocols Missing Error in Windows 10/11
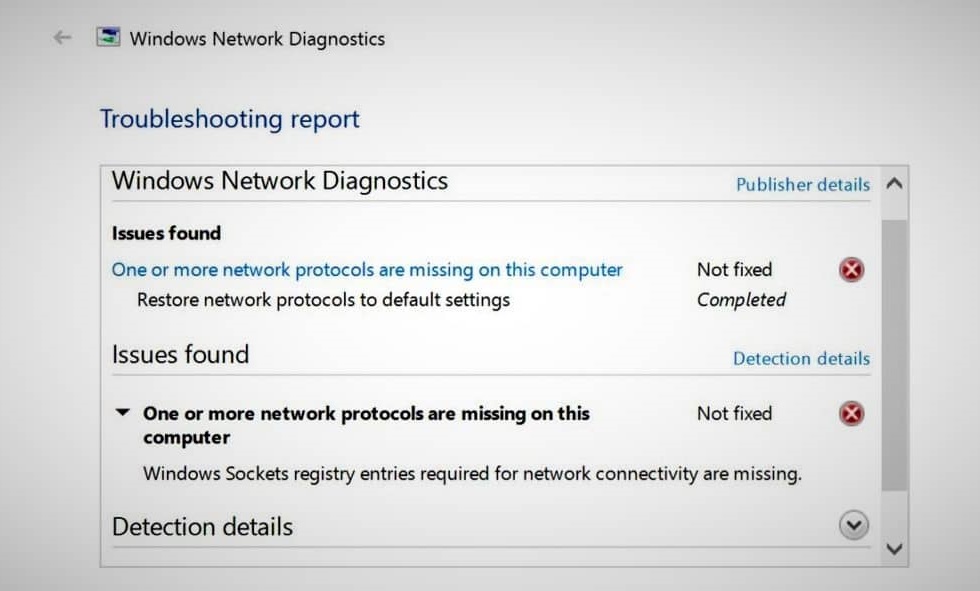
Users may experience an annoying problem in Windows 10/11 where they are unable to share files between network computers, and some are even unable to connect to the internet. When run the Windows Network Diagnostics, they get the error “One or more network protocols are missing on this computer.”
The system shows that it has been connected to the internet, but there is no sign of connectivity and you can’t browse the web. If you dig deeper into the troubleshooting report, you find that the error occurs due to missing Windows Sockets registry entries that are required for network connectivity.
That sounds serious, but worry not; we’ve listed a number of working solutions that will help you solve the problem.
How to Fix One or More Network Protocols are Missing Error
- Temporarily Disable or Reinstall your Antivirus
- Restore Network Protocol Files
- Reset Winsock
- Disable NetBIOS over TCP/IP
- Obtain IP Address Automatically / Set Custom DNS
- Reinstall Internet Protocol (TCP/IP)
- Reset Network Components
- Reset your wireless router
- Reinstall your Network Adapter
- Import Winsock keys from a working computer
Fix 1: Temporarily Disable or Reinstall your Antivirus
First things first, if you are using an internet security suite, then try to temporarily disable it and check if it solves your problem. Follow your antivirus program’s instructions on how to disable it. Alternatively, you can uninstall it, reboot the PC and then test.
If the system works properly, then it’s clearly the security software that is blocking your access to the internet. You may want to change its settings or reinstall a different antivirus program.
Fix 2: Restore Network Protocol Files
Sometimes the network protocol files are corrupt and causing the problem. In that case, you need to restore your network protocols to their default settings. This can be done as follows:
1. Download and run Reimage Plus.
2. Click Start Scan to identify the corrupt files that could be causing the error in Windows 10.
3. If it finds any corrupt files, click Repair All to fix all problems at once.
Fix 3: Reset Winsock
Windows Sockets API, also known as Winsock, manages the network requests of the programs, both incoming and outgoing. If corrupted, you can experience network connectivity problems in form of such errors. In most cases, you just need to reset Winsock to resolve the issue.
1. Press Windows key + S and type cmd in the search box. Right-click on Command Prompt and select Run as administrator.
2. When the Command Prompt window opens, type netsh winsock reset and hit Enter.
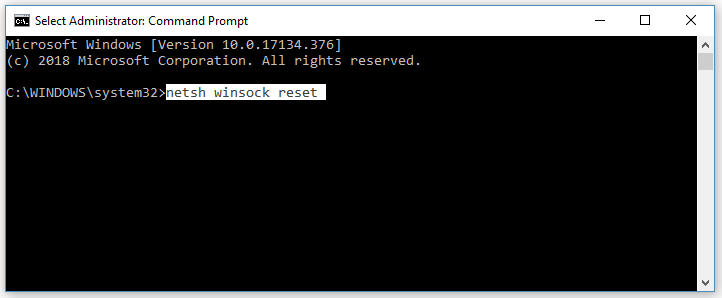
3. Restart your computer and check if the issue is resolved.
Fix 4: Disable NetBIOS over TCP/IP
NetBIOS over TCP/IP are the broadcast protocols that are used in most modern networks for compatibility with legacy Windows versions. However, to improve network performance, it is recommended that you disable these protocols on the domain network. You can follow these steps to disable NetBIOS over TCP/IP:
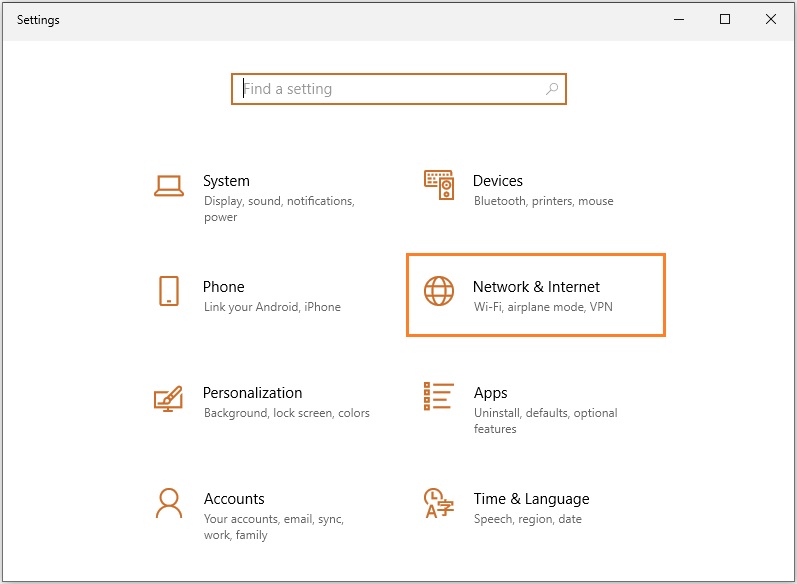
1. Press Windows key + I to open the Settings window. Click on the Network & Internet option.
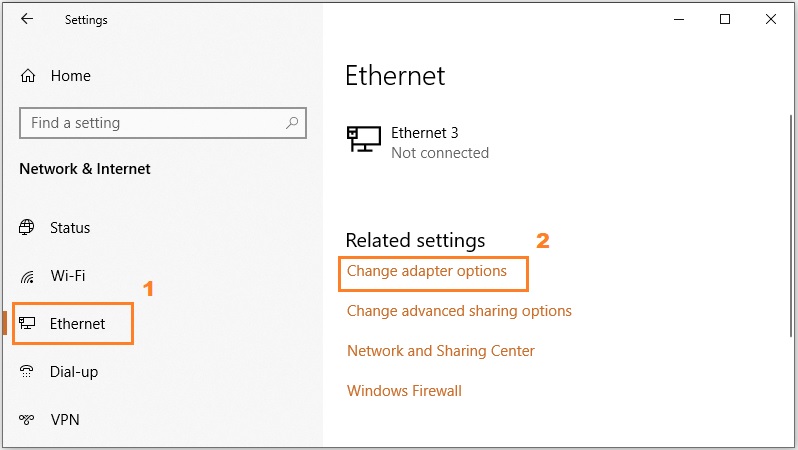
2. From the left pane, select Ethernet. Then scroll down, locate, and click Change adapter options.
3. Right click on your network adapter and select Properties.
4. Highlight Internet Protocol Version 4 (TCP/IPv4) and click Properties.
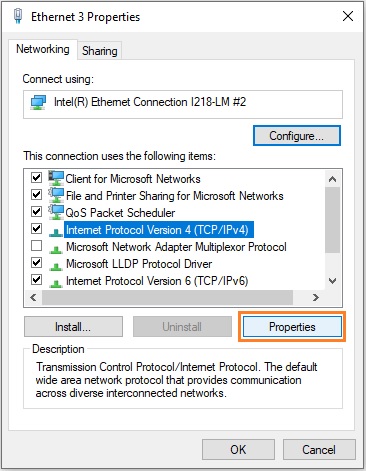
5. In the next window, click Advanced.
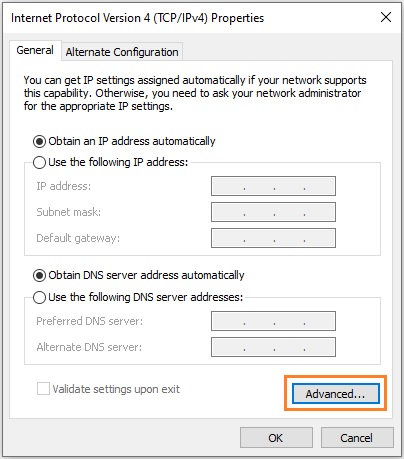
6. This opens another window where you go to WINS tab. Under NetBIOS settings, select Disable NetBIOS over TCP/IP.
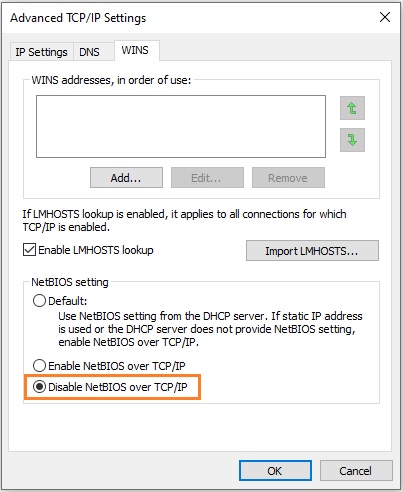
7. Click OK to save your settings.
Restart your computer and check if the problem still exists. If yes, please proceed to the next solution.
Fix 5: Obtain IP Address Automatically / Set Custom DNS
If you are using a static IP, you may want to switch to obtaining one automatically, as this is said to resolve the issue for some users. You can change this setting by following the steps 1-4 from the above method. Once you open TCP/IPv4 Properties, select Obtain an IP address automatically instead of using a static IP address.
You can also try to set custom DNS server settings for your Internet connection. Enable this option by typing any of the following DNS server values:
Google Public DNS:
- Preferred DNS server: 8.8.8.8
- Alternate DNS server: 8.8.4.4
OpenDNS:
- Preferred DNS server: 208.67.222.222
- Alternate DNS server: 208.67.220.220
Apply the changes and you should see your Internet connection start working immediately.
Fix 6: Reinstall Internet Protocol (TCP/IP)
Any discrepancy in the TCP/IP can lead to immediate blockade of your internet access. You can reinstall the protocols to make sure they are not the root cause of the problem. Here’s how to do it:
1. Press Windows key + R to open the Run dialog.
2. Type “ncpa.cpl” in the input field and click OK.
3. Right click on the active connection and select Properties.
4. In the Networking tab, click the Install button.
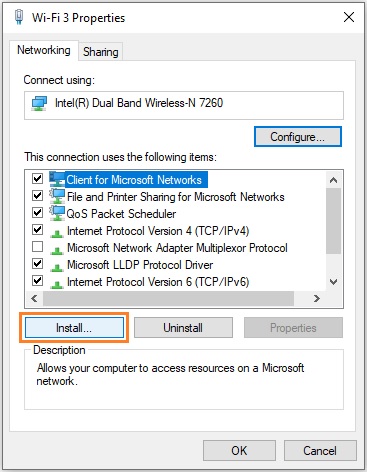
5. In the next window, click Protocol, then click the Add button.
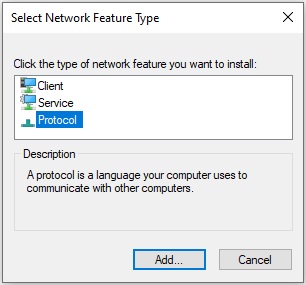
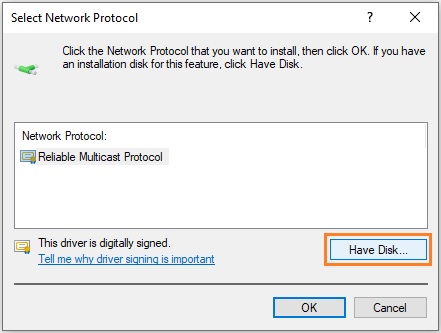
6. Click the Have Disc button.
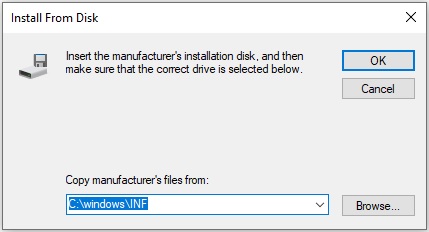
7. Type C:\windows\INF in the browse field and click OK.
8. In the next window, select Internet Protocol (TCP/IP) – Tunnels and click OK.
If you get the error “This program is blocked by group policy” then you need to add one other registry entry to install the protocol. Here’s how to do that:
- Press Windows key + R to open the Run dialog.
- Type “regedit” in there and hit Enter.
- In the Registry Editor, navigate to: HKEY_LOCAL_MACHINE\SOFTWARE\Policies\Microsoft\Windows\safer\codeidentifiers\0\Paths
- Right click on Paths in the left pane and click Delete.
- Now repeat the above process to reinstall TCP/IP.
Once done, restart your system and it should fix the problem at hand.
Fix 7: Reset Network Components
If none of the above methods have worked for you so far, then it’s time to reset and refresh components involved in network connectivity. Here’s the procedure to do that:
1. Create a text file with the following commands and save it as fixnetwork.bat.
ipconfig /flushdns
ipconfig /registerdns
ipconfig /release
ipconfig /renew
netsh winsock reset catalog
netsh int ipv4 reset reset.log
netsh int ipv6 reset reset.log
pause
shutdown /r
2. Right click on the bat file you just created and click Run as administrator.
3. Press any key to reboot the system when it says so, and then TEST. In case it shows any Access denied messages, proceed with the steps below.
Note: The process requires you to perform registry tasks so make sure you create a registry backup before getting started.
4. Press Windows key + R to open the Run dialog.
5. Type “regedit” in the input field and press Enter to open Registry Editor window.
6. Next search for the following value in the Registry editor window:
eb004a00-9b1a-11d4-9123-0050047759bc
The easiest way to do that by holding the CTRL key then pressing F to bring up the Find box. Type the above value in the input space and click Find Next.
7. Once it finds the key, expand it to look for the folder called 26. Here’s the full path to the key:
HKEY_LOCAL_MACHINE/SYSTEM/CurrentControlSet/Control/Nsi/{eb004a00-9b1a-11d4-9123-0050047759bc}/26
8. Right click on 26 and select Permissions.
9. Click the Add button and type Everyone in the text box. If it’s already there, then simply allow Full Control permission for Everyone. Click Apply then OK.
10. Run the downloaded file as administrator.
Fix 8: Reset your wireless router
If the problem continues to occur, try to hard reset your router. You can do this by pressing the Reset button which is normally located on the back of a router. This button is basically a tiny hole so you’ll need a pointy object to put into it, then press and hold the button for a good few seconds.
This will reset your router to factory settings. Once done, restart your router and start reconfiguring it.
Fix 9: Reinstall your Network Adapter
After resetting your router, you might as well want to reinstall your network adapter by following the steps given below:
1. Press Windows key + R to bring up the Run dialog.
2. Type hdwwiz.cpl then press Enter to open the Device Manager window.
3. Locate Network adapters in there and expand the option.
4. Right click on your Ethernet card and choose Uninstall device.
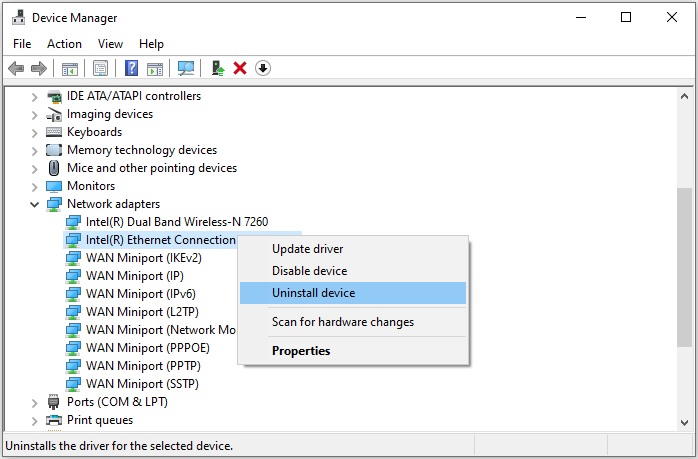
5. Confirm to continue the Uninstall process.
6. Once done, reinstall your network adapter using the driver program provided with the hardware.
Fix 10: Import Winsock keys from a working computer
If everything fails, there is still one more method that you can try, and that is to import Winsock keys from a different computer that doesn’t suffer from these Network Protocol issues. It doesn’t matter if the other device has Windows 10/11 installed on it, or uses an older OS.
Disclaimer: Before you get started, I want to mention that this method involves modifying registry, so proceed only if you know what you’re doing or else you may end up damaging your operating system.
If you’re ready, here’s what you need to do:
1. Uninstall network driver on your computer that has problems with Network Protocols.
2. Find the following keys in Registry Editor:
HKEY_LOCAL_MACHINE\SYSTEM\CurrentControlSet\Services\Winsock
HKEY_LOCAL_MACHINE\SYSTEM\CurrentControlSet\Services\WinSock2
3. Delete both keys. You can also export them, in case you need a backup.
4. Once done, restart your computer.
5. Now switch to the working computer, open its Registry Editor and find the same keys.
6. Export these keys and move them to a USB flash drive.
7. Insert this USB into your original computer.
8. Head over to the same location in your Registry Editor where those keys reside, that is:
HKEY_LOCAL_MACHINE\SYSTEM\CurrentControlSet\Services
9. Import both keys from your USB and close the editor.
10. Next, open Command Prompt as administrator.
11. Type the following line and Enter to run:
netsh winsock reset
Restart your computer again and see if the problem is resolved.
Hope these fixes have helped you. If you have any questions or suggestions, you’re more than welcome to comment down below.
READ NEXT

![[Fixed] Gears of War 4 Crashing Issue on PC](https://digiworthy.com/wp-content/uploads/2019/02/gears-of-war-4-pc_crashing-768x432.jpg)
![Fixed: GeForce Experience Not Working [2022 Update]](https://digiworthy.com/wp-content/uploads/2018/11/geforce-experience-not-working_feat-768x427.jpg)
![Fix: Update Error 0xc19001e1 on Windows 10 [Step-by-Step Guide]](https://digiworthy.com/wp-content/uploads/2020/10/Windows-Update-error-0xc19001e1-img-feat-768x432.png)